I am so embarrassed to even admit this. Tonight I finally delivered a baby gift...almost 16 months after the baby was born! I had a gift ready to go last year, but then it sat on my desk and the baby outgrew the clothes I had picked out...and well, I don't know what happened to the rest of the year. I finally pulled it all together and delivered it tonight. I whipped up a new card, since the new baby isn't a baby anymore! Stacey's Curtain Call Color Challenge: Act 27 was the perfect combination for this little girl card.
The finished card size is 3-1/2" x 5-1/2".
Supplies: Nursery Necessities, Pink Pirouette, Melon Mambo ink & cardstock, Certainly Celery cardstock, Whisper White cardstock, Certainly Celery Patterns DSP, Pretty in Pink Sending Love Epoxy Brads, Small Star Punch
Click HERE to Order Stampin' Up! Products Online, Anytime!
Thursday, April 29, 2010
Wednesday, April 28, 2010
Magnetic Memo Board
This magnetic memo board was a huge hit with my stamp club. I was inspired by a sample that Mary Ellen Stites brought to the Spring Into Stamping meeting last month. After the meeting, she added chalkboard decor elements cut with the Big Shot to her boards. Clever!
I changed the orientation of my board to make it vertical. The first one I did with my downline was more like Mary Ellen's with the Sweet Pea DSP and Stitched Felt on magnets. I made up this version for Stamp Club:
The flower is on a button magnet. The strip of paper at the button is the Sweet Pea DSP paired with plain Bashful Blue cardstock. I adhered them with Towbow Multi Adhesive. The base of the memo board is a piece of metal flashing roof shingle. It came in a package of 10 from our local home improvement store. The shingles are already 5x7, so I didn't have to mess around with cutting metal. We rounded the corners with a heavy duty corner rounder I borrowed from a friend. And the jumbo eyelet was a piece of cake with the Crop-a-dile!
Here's my first version with the felt magnets. Soft and pretty.
I am always making myself little notes, so I envision using these magnetic memo boards by the back door (or front door) with a reminder note so I won't forget anything before I leave.
Supplies: With All My Heart, Bashful Blue ink & cardstock, Chocolate Chip cardstock, Sweet Pea Designer Paper Stack, Fancy Flower Punch, 1-1/4" & 1-3/8" Circle Punches, Sweet Pea Stitched Felt, Whisper White Satin Ribbon, 5/8" Chocolate Chip Grosgrain Ribbon, Crop-a-Dile, Jumbo Eyelets, Neutral Jumbo Brads, Magnets, Metal Flashing Roof Shingles, Tombow Multi Adhesive
Click HERE to Order Stampin' Up! Products Online, Anytime!
Tuesday, April 27, 2010
Flower Fancy Mother's Day Card & Blog Award Shout-Outs
Here's another project from Holli's workshop. I wanted to showcase the Sweet Pea DSP again and one of the stamp sets that is on sale this month. (You can get 20% off Flower Fancy and three other stamp sets until Friday. Click here for details.) My layout was inspired by one of Shelli's recent Workshop of a Lifetime make and takes. Click here to see her card.
Before I wrap this up, I want to give a shout out to Martha and Juliana for nominating me for the Sunshine Award on their blogs. I'm so horrible about following through with blog awards. I get so focused on sharing projects that I kind of let that stuff go a little. So I also need to give shout-outs to Megan, Aimee, Stacey, and Jessica for various blog awards they nominated me for last year. Thank you ladies and sorry for not following through!
Supplies: Flower Fancy, All Holidays, Bashful Blue marker, Mellow Moss marker, So Saffron ink & cardstock, Whisper White cardstock, Basic Black ink, Sweet Pea DSP, Corner Rounder, Scallop Edge Punch, 1/4" Apricot Appeal Grosgrain Ribbon, Stampin' Dimensionals
Click HERE to Order Stampin' Up! Products Online, Anytime!
Monday, April 26, 2010
Cake Time 6x6 and 12x12 Scrapbook Pages
I had a great party with Holli and her friends and family on Saturday. Holli's youngest daughter turns one in a couple weeks (on my due date!), so I designed a scrapbook page celebrating a first birthday. The make and take was this 6x6 page.
Most of the guests chose to fold the 6x6 cardstock in half and turn it into a card. I wish I had taken my camera to the workshop because there were some really creative twists and no two cards looked the same!
I showed everyone who they could take a 6x6 scrapbook page and build around it to complete a page for a larger book. Here's is the 12x12 "Cake Time" scrapbook page with photos of Elise's first birthday last October.
I punched circles from other sheets of Sweet Pea DSP to tie in the pattern on the paper used on the 6x6 page. I typed up the journaling and printed it in brown ink on Whisper White cardstock and then cut it into strips to put on the page. Here's a close-up.
Supplies: Jumble Alphabet, Sock Monkey (cupcake), A Little Birthday Cheer, Pretty in Pink marker & cardstock, Rose Red ink/marker & cardstock, Chocolate Chip ink & cardstock, So Saffron marker, Old Olive ink/marker, Whisper White cardstock, Sweet Pea DSP, 1-1/4" & 1-3/8" Circle Punches, Scallop Circle Punch, 3/4" Circle Punch, 1-3/4" Circle Punch, 1/2" Circle Punch, Playground Designer Buttons, 2-Way Glue, Dazzling Diamonds Glitter
Click HERE to Order Stampin' Up! Products Online, Anytime!
Sunday, April 25, 2010
Awash with Flowers Faux Silk Card
What a terrible week for blog posts! Just when I got caught up with projects to share, the USB cord I used to upload photos from my camera got fried. (Literally, I smelled it burning!!) I have no idea HOW it happened, but I'm all set up with a new card reader and ready to get back to regular daily posts! Thanks for hanging with me and keep checking back for some more new projects!
This card is another project from Stamp Club. We used the Awash with Flowers stamp set to make this Faux Silk card. Click here to find out how you can get this new stamp set early (it won't be officially released until July!).
Remember the Faux Silk technique I showed last month? Click here to see the original post to find out how I got the texture on the flower piece. It's so easy and you probably have the materials you need already at home!
My darling daughter, who is almost 5, just loves to stamp with me. She begged to make this card with us during Stamp Club, but I made her wait until the morning after and she was just tickled that I let her use all the same cardstock and tools as the grown-ups. (I usually have her use other paper or scraps.) She has been proudly showing her card to EVERYONE and I think she may have even slept with it one night!
Supplies: Awash with Flowers, On Your Birthday, Pretty in Pink ink, Almost Amethyst ink & cardstock, Certainly Celery ink & cardstock, So Saffron ink & cardstock, Whisper White cardstock, Basic Black ink, Tissue Paper, Eyelet Border Punch, 1-1/4" & 1-3/8" Circle Punches, Pretty in Pink 1/4" Grosgrain Ribbon
Click HERE to Order Stampin' Up! Products Online, Anytime!
Thursday, April 22, 2010
Flower Fancy Spring Card
Someone was asking me today how long I had until the baby is due. I keep saying "about a month", but when I actually plugged my due date into the baby ticker (posted on the right side of my blog), I was shocked when it said 24 days to go! It's really sneaking up on me! I think I'll go late, so it probably will be more like 30 days, but still....wow! This pregnancy has gone sooooo fast! I'll keep you posted as it gets closer and when the baby actually arrives. And instead of offering a cruise special as I had originally planned (I would have left this weekend for the Southern Caribbean cruise; boo hoo!), I am working on a special promotion for May/June during my "maternity leave".
We finished stamp club tonight, so now I can share those projects with you. I hate posting ahead of time because I like the projects to be a surprise for those who attend. This one took a lot of folding and a little patience, but I think everyone was pleased with the result!
Click here for the Spring Card Tutorial over on Splitcoaststampers to find out how to make this card yourself.
We used the Flower Fancy stamp set, which is one sale this month for 20% off! Click here for all the details. And both Ruby Red and Sage Shadow are colors that are retiring. Click here for details on the Color Renovation and make sure to stock up on these favorites before they go away!
Supplies: Flower Fancy, Teeny Tiny Wishes, Jet Black Staz-On Ink, Ruby Red marker & cardstock, Sage Shadow marker & cardstock, So Saffron maker, Very Vanilla cardstock, 2-Way Glue Pen, Dazzling Diamonds Glitter, Bone Folder
Click HERE to Order Stampin' Up! Products Online, Anytime!
Wednesday, April 21, 2010
Three Sweet Pea Cards
I'm sorry for my spotty posting over the course of the last week. I don't really have a good excuse...just busy with the kids and other stamping activities. This is stamp club week, so I'll be able to share those projects after tomorrow. And I'm working on some cards with stuff from the new Summer Mini, but I think I'm going to save those for May, after the mini catalog starts...I'll have more to share very soon, so keep checking back. I promise to pick up the pace again!
To make up for missing the last couple days, I have THREE cards to share tonight! I made them all this afternoon, using pieces of the Sweet Pea Designer Paper Stack. Some of the designs have large printed images that make them perfect for quick cards without the need for a lot of other stamping. Just what I needed today!
This 4" x 4" card features an image from the coordinating Trendy Trees stamp set. You can get the stamp set 20% off this month! (Click here for details.) All I did on this card was to round the corners and add a greeting.
I used the Elegant Trio Stencils (#118262, $9.95) to add the coordinating flower in the corner of this 4-1/4" x 4-1/4" card.
This 3-1/2" x 6" card has a cut out greeting. There's a circle notch punched from the card front and the greeting is adhered to the inside of the card. I used a little bit of Sweet Pea Stitched Felt in the center of the stamped flower (in the middle of the greeting).
If you haven't already purchased it, the Sweet Pea Designer Paper Stack (#117161) is available in the Occasions Mini Catalog until the end of the month. It's a great value at $24.95 for 48 sheets! Click here to see more projects using the Sweet Pea Designer Paper and matching Stitched Felt. Supplies: Think Happy Thoughts, Thank You Kindly, Soft & Sweet, Bashful Blue ink & cardstock, So Saffron cardstock, Pretty in Pink ink & cardstock, Chocolate Chip ink & cardtock, Whisper White cardstock, Sweet Pea Designer Paper Stack, Elegant Trio Decor Stencils, Stampin' Sponges, 1-1/4" & 1-3/8" Circle Punches, Large Oval Punch, Scallop Oval Punch, Corner Rounder, Scallop Edge Punch, Sweet Pea Stitched Felt, Whisper White Taffeta Ribbon
Click HERE to Order Stampin' Up! Products Online, Anytime!
Sunday, April 18, 2010
A Pop of Yellow
I love Stacey's Curtain Call Color Challenge this week -- grays, white, and a pop of yellow! I was a little worried at first to use so much gray, but once I sat down to stamp, I was so inspired that I made TWO cards!
On this card, I put the rhinestone brad through the holes of the button.
The second card was inspired by a card I had saved on my computer from several years ago. I saved it as a favorite because I love the simple layout. The Fancy Flower Punch that I used is larger than the Star Punch used on the original card, so it's not quite as effective, but I still like the way it turned out.
Supplies: Petal Pizazz, Thank You Kindly, Crushed Curry ink & cardstock, Going Gray cardstock, Basic Gray ink & cardstock, Whisper White cardstock, Razzleberry Lemonade DSP, Fancy Flower Punch, 1-3/8" Circle Punch, 1/2" Circle Punch, Clear Rhinestone Brads, Button Latte Designer Buttons, Whisper White Satin Ribbon, Mini Glue Dots, Stampin' Dimensionals
Click HERE to Order Stampin' Up! Products Online, Anytime!
On this card, I put the rhinestone brad through the holes of the button.
The second card was inspired by a card I had saved on my computer from several years ago. I saved it as a favorite because I love the simple layout. The Fancy Flower Punch that I used is larger than the Star Punch used on the original card, so it's not quite as effective, but I still like the way it turned out.
Supplies: Petal Pizazz, Thank You Kindly, Crushed Curry ink & cardstock, Going Gray cardstock, Basic Gray ink & cardstock, Whisper White cardstock, Razzleberry Lemonade DSP, Fancy Flower Punch, 1-3/8" Circle Punch, 1/2" Circle Punch, Clear Rhinestone Brads, Button Latte Designer Buttons, Whisper White Satin Ribbon, Mini Glue Dots, Stampin' Dimensionals
Click HERE to Order Stampin' Up! Products Online, Anytime!
Saturday, April 17, 2010
Welcome, Little One
A friend of mine had a baby last week. Today, we watched the two older kids so mom and dad could rest and catch up a little. After I took the boys home, I sat down and made this card for the new baby. I'm still working on the gift, something special for her nursery. I'll be sure to post pictures when I'm all done!
I needed some inspiration to get me started, so I turned to the latest Fall To Layout (#86) from Clean & Simple Stamping . I LOVE this sketch! I'm sure I'll be using it again for other cards!
Supplies: Flight of the Butterfly, Nursery Necessities (greeting), Dot to Dot, Regal Rose ink & cardstock, So Saffron ink & cardstock, Lavendar Lace ink & cardstock, Whisper White cardstock, Cottage Wall DSP, Tall Tales DSP, 1-3/8" Circle Punch, 1" Circle Punch, 1-3/4" Circle Punch, Butterfly Punch, Sherbet Designer Buttons, 2-Way Glue Pen, Dazzling Diamonds Glitter, Mini Glue Dots, Stampin' Dimensionals
Click HERE to Order Stampin' Up! Products Online, Anytime!
Thursday, April 15, 2010
Happiest Birthday Card
I haven't been stamping as much as I hoped this week. Sunday night, I made this card for Stacey's Curtain Call Color Challenge #25. But my stamp room was not well-lit and when I woke up in the morning, I realized I had used Very Vanilla cardstock for the greeting. Which wouldn't be a terrible thing, except that the flowers were already stamped on Whisper White and the combination of the two neutrals did not work on this CAS (Clean and Simple) card! It took me just about the whole week to re-stamp that piece and finish the card!
The stamp set I used, Flower Fancy, is on sale this month! Click here for details.
Also, every color that I used on this card (besides Whisper White) will be retiring at the end of June 30. Click here for more details about the Color Renovation.
Supplies: Flower Fancy, On Your Birthday, Only Orange ink, Green Galore ink & cardstock, Pixie Pink ink & cardstock, Yo Yo Yellow Ink, Whisper White cardstock
Click HERE to Order Stampin' Up! Products Online, Anytime!
Tuesday, April 13, 2010
Stenciled Sympathy Card
I made a sympathy card for one of my dowline this week and used the Fall To Layout #85 from the Clean & Simple Stamping blog, as inspiration.
I stenciled on the right side using the Elegant Trio Decor Stencils, Sage Shadow ink, and a Stampin' Sponge. Sooo easy!
The greeting is from a retired stamp set. It has a matching inside greeting to go with it and together they are perfect for this occasion and I break them out just for that purpose.
The finished card size is 3" x 6".
Supplies: Retired greeting stamps, Basic Gray ink, Sage Shadow ink & cardstock, Very Vanilla cardstock, Nouveau Chic DSP, Stampin' Sponge, Elegant Trio Decor Stencils, Basic Gray Taffeta Ribbon
Click HERE to Order Stampin' Up! Products Online, Anytime!
Monday, April 12, 2010
Awash with Flowers Glitter Window
This is one of the cards we made at my group meeting last week. We used the new Awash with Flowers stamp set, which is available as a "sneak peek" this month before it's officially released in July. (Click here for details.)
To make the glitter window, punch a circle from the card front. Place a piece of contact paper over the hole (aka "window") from the back side so that the front is sticky. Pour Dazzling Diamonds glitter over the contact paper and shake off the excess. The glitter will stick to the contact paper for a sparkly view of the stamped image adhered behind it.
Does that all make sense? Leave a comment if you want to see more photos of the steps and I'll try to work on another card this week...
Supplies: Awash with Flowers, Heard from the Heart, Almost Amethyst ink & cardstock, Basic Black ink & cardstock, Whisper White cardstock, Ticket Corner Punch, 1-3/8" Circle Punch, Contact Paper, Dazzling Diamonds Glitter
Click HERE to Order Stampin' Up! Products Online, Anytime!
To make the glitter window, punch a circle from the card front. Place a piece of contact paper over the hole (aka "window") from the back side so that the front is sticky. Pour Dazzling Diamonds glitter over the contact paper and shake off the excess. The glitter will stick to the contact paper for a sparkly view of the stamped image adhered behind it.
Does that all make sense? Leave a comment if you want to see more photos of the steps and I'll try to work on another card this week...
Supplies: Awash with Flowers, Heard from the Heart, Almost Amethyst ink & cardstock, Basic Black ink & cardstock, Whisper White cardstock, Ticket Corner Punch, 1-3/8" Circle Punch, Contact Paper, Dazzling Diamonds Glitter
Click HERE to Order Stampin' Up! Products Online, Anytime!
Sunday, April 11, 2010
In Color Patterns DSP Share: 3 Stacks Available
[Edited, 4/12/10, 8:30 am: These are GONE; thanks everyone!]
I just found a couple stacks leftover from an In Color Patterns Designer Paper Share I did in the fall. The stack includes 6x6 pieces of the Patterns designer paper in each of the 6 In Colors (Melon Mambo, Crushed Curry, Rich Razzleberry, Bermuda Bay, Soft Suede, and Bermuda Bay). There are 6 double-sided patterns in each series, so there are 36 sheets total (six 6x6 sheets of each In Color). The cost, which includes shipping, is $11.95.
I have one complete stack and two that are missing one sheet of Crushed Curry paper, making it 35 sheets instead of 36. Those two stacks are $11.50 instead of $11.95.
So I have three stacks available. Email me if you'd like one. First come, first serve. I'll send a Paypal invoice and mail out the paper next week.
Click HERE to Order Stampin' Up! Products Online, Anytime!
Saturday, April 10, 2010
Top 5 of April 2009
I love that little Search box on the side of my blog. I was thinking of a card just now and looked it up so quickly with that little tool! And then I got to looking back at old cards and thought I'd go ahead and do my Top 5 for April 2009. Each month I'll take a look back at last year's post for the same month and pick out my favorites. Here they are in case you missed them the first time around. Click on the photo to see the original post.
Click HERE to Order Stampin' Up! Products Online, Anytime!
Friday, April 9, 2010
Fifth Avenue Floral Top Note
Last year I sold more of this stamp set than any other...and I don't even own it myself! Fifth Avenue Floral was a huge hit! It's easy and versatile...like a good pair of black pants! And this month you can get this flowery staple for 20% off! Click here for all the details.
Here's a card I stamped up at Mom's house last weekend while the rest of the house was sleeping:
Supplies: Fifth Avenue Floral, Chocolate Chip ink, Rose Red ink, Pretty in Pink ink, So Saffron cardstock, Whisper White cardstock, Top Note die for the big Shot, Sweet Pea Designer Paper, 5/8" Chocolate Chip Grosgrain Ribbon
Click HERE to Order Stampin' Up! Products Online, Anytime!
Fancy Flower Card Kit
It's time for a new project kit! My project kits are a great alternative to attending a class in person. You can stamp in the convenience and comfort of your own home when your schedule allows. My newest kit includes four bright, coordinating cards that would make a great gift packaged in the matching gift box (included in the kit). You'll love the clean and simple designs and want to come back to these layouts again and again.
The Fancy Flower Card Kit uses the With All My Heart stamp set available until April 30 in the Occasions Mini Catalog. U.S. Customers can add the stamp set to the kit and save 20%. (The Card Kit plus stamp set is $31.95 + s/h.)
Click here for more details and to order your own kit.
http://juliedavison.com/ProjectKits/1004_FancyFlowerCardKit
Click HERE to Order Stampin' Up! Products Online, Anytime!
Thursday, April 8, 2010
Park Play 12x12 Scrapbook Page
I love the Simply Scrappin' Kits to make scrapbook pages. It's so easy and quick with all the coordinating designer paper, textured cardstock, and self-adhesive die-cuts. Here's a 12x12 page I made for a workshop last month. I just realized I didn't include a date in my journaling. The photo on the page is of my daughter Claire from the middle of March this year.
The journaling reads: "Spring has sprung! We are so happy to be playing outside and making our spring tour of local parks." You can check out more pictures of my kids at the park on my family blog here.
Supplies: Petal Party Simply Scrappin' Kit, Taffy Alphabet, Pumpkin Pie ink, Basic Black Journaler, Whisper White cardstock
Click HERE to Order Stampin' Up! Products Online, Anytime!
A Color Makeover
Stampin' Up! announced on Tuesday that they are "renovating" the color palette! I'm excited about the changes, which include retiring some of the current colors (many of which I almost never, ever use!), bringing back some previous In Colors (wahoo for Baja Breeze, Pink Pirouette, and River Rock!), and adding 5 new Core Colors. Included in all these changes is a complete rearranging of the color collections and some changes to the annual In Colors (which will now stick around for two years instead of just one!)
I realize this is a lot to digest, but I know that Stampin' Up! has spent a lot of time and energy over the last two years to make this the renovation effective and to give us color palettes that are strong, fresh, and updated. They have also put into place several programs to make it easy for demonstrators and customers to update their current collections at a pace and budget for every pocketbook.
The big changeover will take place on July 1st, when the 2010-2011 Idea Book and Catalog is released. But you don't have to wait to see these new color collections! Click here to view the new color palette and see what colors are coming back and the new ones we'll get to play with.
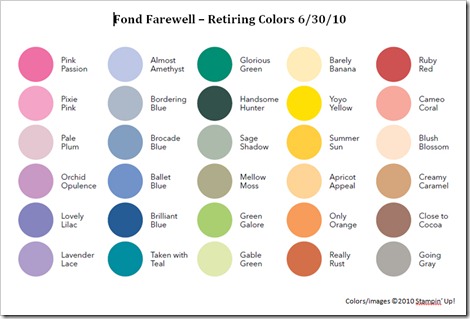
In the meantime, let's focus on the colors that are retiring. There are quite a few, but you have plenty of time to stock up on your favorites (don't forget reinkers, cardstock, and coordinating accessories). These products will be available until June 30 (although after June 1st, it's only "while supplies last"), so don't wait to get your order in! Click the image below for a printable flyer of the retiring colors.
Click HERE to Order Stampin' Up! Products Online, Anytime!
Wednesday, April 7, 2010
Trendy Trees Thinking of You
Remember when I said I had hoped to stamp in the wee morning hours at Mom's house before we left? Turns out instead of getting up early, I stayed up late and stamped by myself in those wee early hours. I wanted to play with some of Mom's stamp sets that I didn't have at home, including the Trendy Trees stamp set, which is on sale this month for 20% off. (Click here for details.)
Here is the card I came up with. It's simple, but I love the clean look!
I remembered some cards I made a few years back where I had CASEd this layout from the then-current catalog. You can see my old cards in my SCS gallery here and here. It's a great layout for small images with coordinating wheels!
Supplies: Trendy Trees, Funky Forest Wheel, Old Olive ink & cardstock, Soft Suede ink & textured cardstock, Whisper White cardstock, 1-3/4" Circle Punch, Soft Suede Polka Dot Ribbon, Stampin' Dimensionals
Click HERE to Order Stampin' Up! Products Online, Anytime!
Tuesday, April 6, 2010
For You Box #2
I'm exhausted. After traveling all day Monday and then prepping for tonight's downline meeting -- and then traveling to and doing the meeting and driving back home (it's 90 minutes one way) -- I should really just go to bed right now. The meeting was great; thanks to everyone who came! We had some big news to discuss because today Stampin' Up! announced some upcoming changes to our color palette. I'm really excited about it and will share some more details in the next day or two.
In the meantime, here's a quick project to share. This was a make and take at my hands-on workshop last week. We used the Vintage Labels Sale-a-bration stamp set which many of you have. And if you don't have it and missed getting it during Sale-a-bration, you could easily substitute the label image for something else.
Supplies: Vintage Labels, Pretty in Pink ink, Soft Suede ink, Whisper White cardstock, Certainly Celery cardstock, Sweet Pea Designer Series Paper Stack, Box #2 die for the Big Shot, Scallop Circle Punch, 1" Circle Punch, 1/4" Whisper White Grosgrain Ribbon, Stampin' Dimensionals, Sticky Strip
Click HERE to Order Stampin' Up! Products Online, Anytime!
Monday, April 5, 2010
Awash with Flowers Tri-Panel Card
Here's another card with the new Awash with Flowers stamp set. (Click here to find out how you can get this sneak peek stamp set in April.) I re-used an old layout with a few tweaks. Click here to see the original inspiration card.
Supplies: Awash with Flowers, On Your Birthday (greeting), Taken with Teal ink & cardstock, Old Olive ink & cardstock, Jet Black Staz-On ink, Very Vanilla cardstock, Kraft cardstock, 2-Way Glue, Dazzling Diamonds Glitter, Corner Rounder, Mat Pack, Paper Piercer, Gold Brads
Click HERE to Order Stampin' Up! Products Online, Anytime!
Sunday, April 4, 2010
Gratitude Bird Book
Happy Easter! I hope your day has been filled with blessings and happy memories-in-the-making. I have enjoyed my weekend with family and am sad to have to leave tomorrow morning. Time always goes much too fast and we never get everything done that we want to. Unfortunately, this time, that meant no stamping with Mom. Maybe we'll wake at the wee hours of the morning and sneak down here before everyone else gets up!
Speaking of taking the time, I wanted to share this poem shared during today's sermon at church. It really kind of stuck with me.
Take time to think; it is the source of power.
Take time to read; it is the source of wisdom.
Take time to pray; it is the greatest power on earth.
Take time to love and be loved; it is God's gift to you.
Take time to be friendly; it brings happiness.
Take time to laugh; it is music for the soul.
Take time to give; it is too short a life to be selfish.
Take time to work; it is the price of success.
Take time to help the poor; it opens the door to Heaven.
Take time to listen; it may be God speaking.
~Author unknown
And finally, here's my project to share today. I didn't create this myself. It was a gift from my upline Kim Peck for helping out with the Spring Into Stamping meeting. She used Kimberly Van Diepen's design to create these special books as thank you gifts. I am amazed at the beautiful details: the glittered edges, the sponged sides, the Pretties Kit Pearls, the die cuts...it is absolutely stunning!
The book was created with the On Board Bird Book (#117238) from the Occasions Mini Catalog. It includes 8 plain chipboard pieces and the chain for only $4.95! It's also available in heart and flower shapes. Here is one of the inside pages all decorated with cardstock and designer paper:
And here's some close-up of the gorgeous details:
Saturday, April 3, 2010
Flower Fancy Circle Card
I originally made this as a sympathy card for one of my downline. I was having a little stamper's block and saw a card across on the room on my display board that was perfect, so I used the same layout and changed the colors and stamp set and came up with this card:
I love re-using old layouts and bringing new life to an older design. That's one of the things I love about stamping is that you don't have to create something brand new every time!
This is one of the stamp sets you can get for 20% off in April! Click here for more details about the Two-Step Spring Promotion.
Supplies: Flower Fancy, Teeny Tiny Wishes, Jet Black Staz-On, Taken with Teal marker & cardstock, Old Olive marker & cardstock, Very Vanilla cardstock, So Saffron marker, Sweet Pea Designer Series Paper Stack, Very Vanilla 1/4" Grosgrain Ribbon, Circle Scissor Plus, 2-Way Glue Pen, Dazzling Diamonds Glitter, Stampin' Dimensionals
Click HERE to Order Stampin' Up! Products Online, Anytime!
Friday, April 2, 2010
Awash with Flowers Thank You
I designed this card for my downline shoebox swap last month. I love the clean layout, which I borrowed from an old convention swap from several years ago.
The flower is from the brand new Awash with Flowers stamp set. This stamp set won't be released until the new catalog come out in July, but you can it early -- this month only for $27.95 (clear mount) or $39.95 (wood mount) -- or FREE when you host a workshop over $350 in April. Click here to see the whole stamp set and all the details of the Two-Step Spring promotion.
Supplies: Awash with Flowers, Flight of the Butterfly (greeting), Chocolate Chip ink & cardstock, So Saffron ink, Mellow Moss ink & cardstock, Whisper White cardstock, Sweet Pea Designer Series Paper, 1/4" Whisper White Grosgrain Ribbon, 2-Way Glue, Dazzling Diamonds Glitter, Stamp-a-ma-jig
Click HERE to Order Stampin' Up! Products Online, Anytime!
Free Stamp Set of the Month: Picture This
Thanks to everyone who placed an order with me in March! I drew one winner from all of the online and email orders and Helen from Caledonia is the lucky stamper to win the Best Yet stamp set! Congratulations, Helen!
It's a new month and time for a new free stamp set giveaway! Each month, I will give away a free stamp set. To be eligible for the drawing, all you have to do it place an online order (email orders count too!) that is not part of a club or workshop. You'll get one entry for each order that you place with me between April 1-30. I'll draw a winner on May 1st. This month's stamp set is Picture This, a current level 1 hostess set. You can also get this stamp set for FREE when you place an order over $150 or host a workshop! Call or email me to schedule your next party!
Ready to place an order now? Click here to go right to my online store and shop from the convenience and comfort of your home.
Click HERE to Order Stampin' Up! Products Online, Anytime!