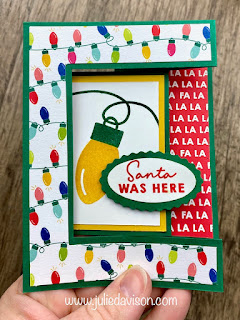
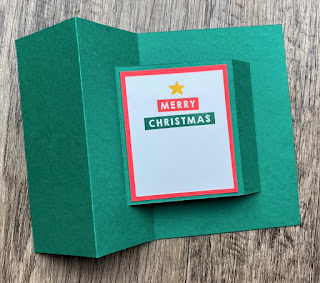
I was inspired to try this fun fold card when I saw Jo William's Christmas card that she shared for the Novemebr Great, Big Card Swap. Jo was so generous to include a printout of the template that she found from Lavonne Schwendeman, so it was easy to create my own version, which I shared last week during my Thursday Night Livestream. Here is my finished card using the Merry & Bright stamp set from the Sept-Dec 2023 Stampin' Up! Mini Catalog.
Card Measurements:
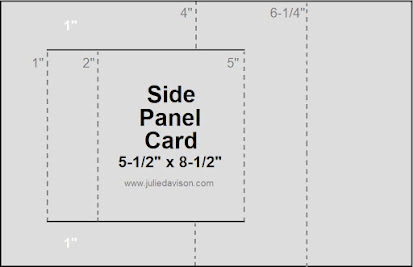
- 5-1/2" x 8-1/2" Shaded Spruce Cardstock (See Template Below)
- Score at 6-1/4" all the way down
- Turn cardstock so short end is at the top of the trimmer and line it up at the 1" mark. CUT from 1" down to 5". Do the same thing using the 1" mark on the right side of the trimmer.
- With the long side of the cardstock at the top of the trimmer, SCORE between the cut lines at 1", 2", and 5".
- SCORE above and below the cut lines at 4".
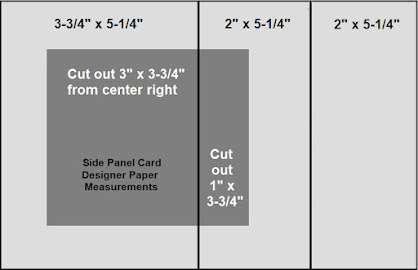
- 3-3/4" x 5-1/4" Merry Bold & Bright Designer Paper, cut 3" x 3-3/4" from the center right side
- 2" x 5-1/4" Merry Bold & Bright Designer Paper, cut 1" x 3-3/4" out from the center left side.
- 2" x 5-1/4" Merry Bold & Bright Designer Paper
- 3/4" x 3-3/4" Merry Bold & Bright Designer Paper
- (2) 2-1/2" x 3" Basic White Cardstock
- 2-3/4" x 3-1/4" Crushed Curry Cardstock
- 2-3/4" x 3-1/4" Poppy Parade Cardstock
Watch the video replay to follow along and cut and score this fun fold card with me. I'll warn you when it comes to the stamping part...well, I was a little indecisive! If you enjoy watching the "process", grab some popcorn. If that frustrates you, then just fast forward through to the next project! Ironically, I ended up no far off from my first iteration with just a few changes that balanced everything out: a additional piece of cardstock on the inside panel and moving the "glow" of the light from the bottom to the side. (See photos above.)
Live in the United States?
Shop with Me for a FREE gift! http://juliedavison.com/shop
Use Hostess Code HJW9UP9S for December 2023 to get a FREE Make and Take Kit and FREE GIFT when you order $40 or more. Free kits are mailed at the end of the month. Limit one per person. Shop Now
Sept-Dec 2023 Mini Catalog
Up to 60% Off Last Chance Products
- See List of Deals w/Photos (.pdf)
- See Full Last Chance List (.pdf)
- Shop Now with Host Code HYQCKN3A
- Sale ends January 4, 2023


1 comment:
I know we all wanted to help you with the card! lol But we were all so far away. It's great to see your process, and we wouldn't change that for the world! Keep on creating!
Post a Comment