Showing posts with label Vacation Stamping School. Show all posts

Monday, July 4, 2022

NEW! July-December Mini Catalog + Upcoming Events

New goodies are here!! The July-December 2022 Mini Catalog launched on Friday, July 1st! Did you get your copy in the mail? 
This Mini Catalog is not just Christmas! Although there are beautiful new designer papers and bundles to celebrate the holidays, you'll find new products to celebrate all year long!

Stampin' Up! Splendid Day Suite ~ July-December 2022 Mini Catalog #stampinup

Reserve a Mini Catalog Product Share

Reserve a product share and you can sample it all without having to buy full packs yourself!  This year's July-December 2022 Mini Catalog Product Share from Julie includes 6" x 6" pieces of all the designer paper (including the Host-Exclusive Designer Paper!!) and a yard of every ribbon to coordinate!

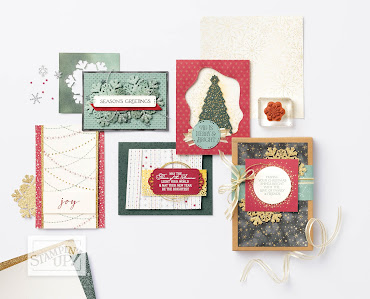
Get a closer look at the new designer paper and ribbon in the July-December 2022 Mini Catalog plus a few projects that I made with them!

12 Days of Christmas Gift Box

Celebrate the launch of the July-December 2022 Stampin' Up! Mini Catalog and Christmas in July with 12 individually wrapped gifts -- $100 in full-size current Stampin' Up! products --  PLUS a bonus gift from Julie! 

Get ready to go handmade this holiday season! Open a gift each day starting July 25 and follow along with a special video series as I share a special project featuring each gift.


Cost is $120 plus $15 for Priority Mail Postage (United States Only)

All gift boxes paid for by July 15, 2022 will be shipped via U.S. Priority Mail by July 20 2022.

Vacation Stamping School -- Attention Demontrators!!

We are opening up our 17th annual team training event, Vacation Stamping School, to ALL demontrators! Join us for this virtual event on Saturday, August 6, 2022 for a full day of inspiration including business training & tips, 5 Suite Spotlight Demonstrations, and Lights Aglow Mix & Match Class with 7 Interactive Stamping Projects -- plus a SWAG Box with gifts & prizes (US Only)!

Registration Ends July 11, 2022


We'll be featuring the Lights Aglow Suite from the July-December 2022 Mini Catalog. Here are some projects that Stampin' Up! Concept Artists created for the Mini Catalog:

Do you love to CASE the Catalog like I do? Download the July-December 2022 Mini Catalog Project Supply List:


Live in the United States? 
Shop with Me for a FREE gift! http://juliedavison.com/shop

Use Hostess Code GTUHDYDN to get a FREE Make and Take Kit and FREE GIFT when you order $40 or more. Free kits are mailed at the end of the month. Limit one per person. Shop Now
The Great, Big Card Swap ~ www.juliedavison.com
The Great, Big Card Swap
Send a card! See them all! Get one back!

Send Cards to: Julie Davison, PO Box 6164, Champaign, IL 61826
Send Full Size Card.
Include return postage stamp. Envelopes will be provided.
Don't write inside! Include a sticky note or loose paper.

July 2022 Theme: Birthday
Swap Showcase Videos: Tuesdays, July 12 & 26

Tuesday, August 27, 2019

Holiday Catalog Sneak Peeks + Vacation Stamping School Highlights

2019 Stampin' Up! Holiday Catalog Sneak Peeks + Vacation Stamping School Highlights ~ www.juliedavison.comSaturday marked the 14th annual demonstrator training event that I have helped organized. Formerly Spring Into Stamping and now called Vacation Stamping School, we moved our event to late summer when Stampin' Up! starting holding On Stage in April. The timing works out perfectly as it gives us an opportunity to train our team and demonstrator friends on the upcoming Holiday Catalog. 
2019 Stampin' Up! Holiday Catalog Sneak Peeks + Vacation Stamping School Highlights ~ www.juliedavison.com
It's a full day of stamping  and sharing -- from morning and afternoon demonstration fairs (with a total of 10 booths to view), make and takes, and main stage presentations -- I think it's safe to say that everyone left feeling inspired and motivated as we prepare for the launch of the Holiday Catalog next week. Here are a few photos that capture some of my favorite things:

2019 Stampin' Up! Holiday Catalog Sneak Peeks + Vacation Stamping School Highlights ~ www.juliedavison.com

Terri Gaines, a Million Dollar Sales Achiever, was our guest speaker this year. She shared her 12 Weeks Before Christmas project collection with us and WOW!! Each project was amazing! Here is one of my favorites. I created the half-circle pop up card four years ago and was so excited to see Terri breathe new life into this card design with the Let It Snow Suite and new Snowman Builder Punch. Click here to see my original tutorial.
2019 Stampin' Up! Holiday Catalog Sneak Peeks + Vacation Stamping School Highlights ~ www.juliedavison.com


My favorite technique was one shared by Linda Yearsley. She embossed the colored foil sheets with the new Winter Knit embossing folder, applied Versamark ink, and heat embossed with different metallic embossing powders. The result was stunning!! I can't wait to try this technique!

2019 Stampin' Up! Holiday Catalog Sneak Peeks + Vacation Stamping School Highlights ~ www.juliedavison.com
Karla Endris created a beautiful display for her demonstration booth. Look at this amazing "Gather" banner!
2019 Stampin' Up! Holiday Catalog Sneak Peeks + Vacation Stamping School Highlights ~ www.juliedavison.com
>
2019 Stampin' Up! Holiday Catalog Sneak Peeks + Vacation Stamping School Highlights ~ www.juliedavison.com

Doesn't this always happen?! My Holiday Catalog wish list grew -- a lot -- after seeing so many amazing projects, like the snow globe cards and ornaments that Rachel Chamberlain shared. I didn't think I needed that bundle!
2019 Stampin' Up! Holiday Catalog Sneak Peeks + Vacation Stamping School Highlights ~ www.juliedavison.com

2019 Stampin' Up! Holiday Catalog Sneak Peeks + Vacation Stamping School Highlights ~ www.juliedavison.com

Have you seen the Feels Like Frost Designer Paper? This 6x6 paper pack is gorgeous with photo-realistic images on one side and metallic designs on the others. Rachel used this paper on the card above and Ramona Simpson created the card below. Ramona also shared how she added color to the metallic side to make the paper more versatile. Wow!!
2019 Stampin' Up! Holiday Catalog Sneak Peeks + Vacation Stamping School Highlights ~ www.juliedavison.com

2019 Stampin' Up! Holiday Catalog Sneak Peeks + Vacation Stamping School Highlights ~ www.juliedavison.com

This is just the tip of the iceberg! What an amazing day! I hope you'll join us next year for Vacation Stamping School! Not a demonstrator yet? Join in August and (1) Choose Holiday Catalog goodies in your Starter Kit and (2) Get an EXTRA $30! That's $155 in product of your choice for only $99 plus tax! Plus you'll get a $10 coupon for your next order in September or October. Learn More about being a demonstrator.

A special shout-out and thanks to my co-organizers, pictured with me below: Mary Ellen Stites and Meg Loven with long distance support from our upline Kim Peck. I feel so blessed to have such an amazing team to work with!

 
And many thanks to our special guest from the Stampin' Up! Home Office, Jen Campbell! It was such a treat to hear Jen share a little behind-the-scenes insight on what it was like to work on the Holiday Catalog. She also shared some of her favorite projects that she designed as a Concept Artist.

Stay tuned! I'll be sharing more projects this week, including the make and takes that I designed for Vacation Stamping School!


Live in the United States? 
Shop with Me for a FREE gift! http://juliedavison.com/shop

Use Hostess Code REYHMUP2 to get a FREE Make and Take Kit and FREE GIFT when you order $40 or more. Free kits are mailed at the end of the month. Limit one per person. Shop Now


Last Chance! Redeem $5 Bonus Day Coupons by August 31!


Coming Soon! 2019 Holiday Catalog starts September 4th!

Join as a Demonstrator and get Holiday Catalog goodies NOW in your Starter Kit -- plus get an extra $30 NOW  -- that's $155 in product of your choice for only $99 plus tax -- when you join by August 31 PLUS a $10 coupon for your first order in September or October! 
Learn More


Wednesday, October 25, 2017

Guest Artist: Sandy Jacobson + 5 Glossy Cardstock Techniques

I am always inspired by what Sandy Jacobson creates! She is so talented! Sandy outdid herself for her Vacation Stamping School demonstration in August by showcasing not one or two, but MANY techniques using Glossy Cardstock -- which is back again in the latest Annual Catalog! Check some of Sandy's amazing projects!
Sandy showed many ways to spread color on to glossy cardstock. Because the cardstock is coated, it takes longer for the ink to set in and dry, which means that you have more time to smear, paint, and manipulate the ink. After you apply ink using an AquaPainter or sponge dauber, use water or alcohol in a Stampin' Spritzer to spread the color. The result will be different every time you try it!
Guest Artist: Sandy Jacobson + 5 Glossy Cardstock Techniques
Pin It!
Guest Artist: Sandy Jacobson + 5 Glossy Cardstock Techniques
Here are some more cards created by Sandy and her tips for some different techniques:
Guest Artist: Sandy Jacobson + 5 Glossy Cardstock Techniques
Pin It! 
Galaxy Technique: (inspired by Maria Willis)
  1. Use sponge dauber to sponge glossy cardstock with Daffodil Delight across the middle of the cardstock.
  2. Next, sponge Berry Burst around the Daffodil Delight and overlapping a little bit.
  3. Sponge Rich Razzleberry around the Berry Burst.
  4. Next, add Dapper Denim around the edges and over some of the other colors.
  5. Lastly, add Black ink by starting at the edges and working inward. Cover some of the other colors to it appears that the other colors are peeking through from behind.
  6. Flick some rubbing alcohol on to the cardstock using your finger or an AquaPainter.
  7. Flick Wink of Stella across the background to add sparkle.
Guest Artist: Sandy Jacobson + 5 Glossy Cardstock Techniques
Pin It! 
Polished Stone Technique:
  1. Saturate a cotton ball with rubbing alcohol and add about 3 drops of re-inker. Dab the cotton ball over the glossy cardstock.
  2. Add additional colors if desired and allow to dry.
Guest Artist: Sandy Jacobson + 5 Glossy Cardstock Techniques
Pin It! 
Retro Brayer Color Blocks Technique:
  1. Stamp your images on the Glossy Cardstock.
  2. Select 3 colors within the same color family (a light, medium, and dark color). 
  3. Brayer your cardstock with your lightest color all over. 
  4. Add a couple small sticky notes to cover 1-2 spots of cardstock.
  5. Brayer over your cardstock with the medium color. 
  6. Add 1-2 more small post it note.
  7. Brayer the cardstock using your darkest color. 
  8. Remove your post it notes and embellish your card.
Guest Artist: Sandy Jacobson + 5 Glossy Cardstock Techniques
Pin It! 
Tip: Sponge ink onto Glossy Cardstock then spritz with water to get a speckled appearance.
Guest Artist: Sandy Jacobson + 5 Glossy Cardstock Techniques
Pin It!
Wax Paper Resist Technique:

Supplies: embossing folder of your choice, a piece of waxed paper, a piece of cardstock, glossy cardstock, sponge daubers, ink pads, and an iron. 

  1. Cut the waxed paper to the size of your embossing folder and run it through your Big Shot. 
  2. Place the embossed waxed paper on top of your glossy cardstock. Add regular cardstock on the top and iron.  It won’t take long until the wax melts onto your glossy cardstock. 
  3. Remove the glossy cardstock from the embossing folder and sponge with the color(s) of your choice.
Stampin' Up! Shopping List

Live in the United States? I would love to be your Stampin' Up! Demonstrator!
Click HERE to  Order Stampin' Up! Products Online, Anytime!

2017 Stampin' Up! Holiday Catalog
Use Hostess Code SJMS7KT4 to get a FREE Make and Take Kit and FREE GIFT when you order $40 or more. Free kits are mailed at the end of the month. Limit one per person. Learn More

Monday, October 23, 2017

Guest Artist: Ramona Simpson + Tarnished Metal Technique

I am a simple stamper. I don't like messy techniques. While the Tarnished Metal Technique isn't really THAT messy, it's definitely something that I have never tried! I was captivated by Ramona Simpson's demonstration at Vacation Stamping School in August. I love how this technique looks different every time you do it. No two pieces will ever be the same and that makes these handmade cards even more special!
Check out these amazing backgrounds that Ramona created with the Tarnished Metal technique! Give Ramona some love over on her Facebook Page and check out a few more Tarnished Metal photos at Handmade By Ramona.
Tarnished Metal Technique Instructions ~ backgrounds created by Ramona Simpson
Pin It!
You'll need some foil cardstock, Versamark ink, a variety of metallic embossing powders, and a Heat Tool for this technique. Here's how to do it:

Tarnished Metal Technique:
  1. Lightly smear permenant black ink (such as Staz-On or Archival Basic Black ink) over the top of Foil cardstock. Allow to dry completely.  
  2.  Run the cardstock through the Big Shot using any Embossing Folder. (optional)
  3. Use VersaMark direct to paper (or use a sponge dauber) to lightly dab the cardstock. Apply metallic embossing powder and heat to emboss. Repeat this process with additional embossing powders.  
  4. Use Versamark and stamp onto foil sheet as desired.  Use another embossing powder to highlight the stamped image.  
  5. When happy with result, lightly go over the top of the cardstock with the black ink pad again to give it a tarnished look.  Allow to dry completely before completing your project.
Tarnished Metal Technique Instructions ~ cards created by Ramona Simpson
Pin It!
Tarnished Metal Technique Instructions ~ cards created by Ramona Simpson
Pin It!

Stampin' Up! Shopping List
 
Live in the United States? I would love to be your Stampin' Up! Demonstrator!
Click HERE to  Order Stampin' Up! Products Online, Anytime!

2017 Stampin' Up! Holiday Catalog
Use Hostess Code SJMS7KT4 to get a FREE Make and Take Kit and FREE GIFT when you order $40 or more. Free kits are mailed at the end of the month. Limit one per person. Learn More