Tuesday, March 31, 2009

Botanical Blooms Make & Take

[Edited 4-4-09: This card uses the same colors as Kristina Werner's Color Inspiration Challenge #48! I love this combination of Baja Breeze, Kiwi Kiss, and Chocolate Chip. I'll have to try and make another card with this color combo this weekend.]

Last weekend, Rosemary had a "catalog party" that was quite a party! Because I was in Hawaii and couldn't be there in person, I prepared a project ahead of time for Rosemary and her guests and they partied without me. I hear Rosemary had quite a spread of yummy food and got out her other stampin' supplies for guests to use and create with. She ended up with several orders and among other hostess benefits, got a free Sale-a-bration stamp set for hosting a party with over $300 in orders. Here is the card I sent for Rosemary and her guests to make:

Interested in holding your own catalog party? You can collect orders any time and receive hostess benefits when those orders total $150 or more. If you'd like to do a casual stamping get-together like Rosemary, I would be happy to provide a project for you and your friends to make while you peruse the catalog and write up your orders. Send me an email for details!

And if you host a catalog party with $150 or more in orders during the month of April, you'll get a free stamp from the "Under $10" page of the Spring-Summer 2009 Idea Book & Catalog!


Supplies: Botanical Blooms, Chocolate Chip ink & cardstock, Baja Breeze ink & cardstock, Whisper White cardstock, Kiwi Kiss ink & cardstock, Corner Rounder, Button Bouquet, Mini Glue Dots

Congratulations Baby Card

When I saw the colors for Stacey's Jewelry Color Inspiration #29, I immediately thought of making a baby card. I love the way the Real Red pops with the softer Bashful Blue and Barely Banana. I used the Nursery Necessities stamp set and some Sale-a-bration products (the Delicate Dots DSP and Congrats stamp set) with this classic layout. The finished card is 3" x 6".
Last chance to Sale-a-brate! The sale ends today! Click here for all the details.

Supplies: Nursery Necessities, Congrats, Whisper White cardstock, Real Red ink/marker & cardstock, Barely Banana marker & cardstock, Bashful Blue ink, White grosgrain ribbon, 1-3/4" Circle Punch, Large Star Punch, Delicate Dots DSP, Mini Glue Dots, Stampin' Dimensionals

Monday, March 30, 2009

Oops, She Did It Again!

I'm back from Hawaii!! Oh my, we had an incredible trip to paradise. I'll share some photos later when I get them all uploaded and sorted. It was beautiful. The sun was perfect. Elise cooperated. I swam with turtles!! I went to bed early every night. It was a dream vacation. Truly!! So thank you Stampin' Up! and thank you downline and customers for helping me earn it!

When we landed back in Chicago from Hawaii, the pilot said "Welcome back to reality, folks!" Yes, we're back to reality and I've got loads on my plate this month. But I made some time for stamping last night after the kids were in bed and the suitcases were unpacked. It felt good to be home!

I tackled some color challenges. Here's the first card, for Kristina Werner's Color Inspiration Challenge #47. Hopefully my mom's not reading this yet because I'm sending her this card. I used the Sale-a-bration stamp set "Congrats" for the greeting: "you've outdone yourself again". I really like this little set. It has lots of possibilities! And better yet, it's FREE with any $50 purchase -- but you have to "Shop Now" because the sale ends tomorrow (Tuesday, March 31)! Click here for all the details.

I keep getting distracted. Ok, so "Oops, She Did It Again!" -- my mother. She's ROCKIN' this year and even with watching my children while I was in Hawaii, she still managed to break her monthly personal sales record yet again with March sales of over $4,500! Dang! You've truly outdone yourself, Mom! I'm so proud of you!!

Supplies: Congrats, So Saffron cardstock, Chocolate Chip Patterns DSP & ink, Whisper White cardstock, Tangerine Tango cardstock, Pretties Kit, Curly Label Punch, 1" Circle Punch, Crafters' Tool Kit (paper piercing around circle), Tangerine Tango Ribbon, Mini Glue Dots

Saturday, March 28, 2009

Happy Chick Card

I really like the way this background turned on. I clear embossed the flowers on the Lavender Lace cardstock and then colored in the petals with the white gel pen and added a dot in the middle with the So Saffron Watercolor Crayon.

[The finished card is 3" x 6".]

Supplies: A Good Egg, Basic Black ink, Whisper White cardstock, So Saffron cardstock & marker, Versamark ink, Clear Embossing Powder, Watercolor Crayons, White Gel Pen, Pewter Hodge Podge Hardware, 1/4" White grosgrain ribbon

Friday, March 27, 2009

Delicate Dots Quilt Card

Here's the last of our Stamp Club projects from last week. I have seen these quilt cards all over the web and couldn't resist making one of my own. I used the Sale-a-bration Delicate Dots DSP and Ribbon Bundle. (There are just a few more days left of Sale-a-bration! Click here to find out how to get these for free!)

Thanks again to Laurie for letting me borrow the Quilt Quips stamp set for the greeting under the quilt. It's perfect!

The base of the card is 5-1/2" x 6", folded in half so that the card is 5-1/2" x 3". The quilt is adhered to then card that that the finished height is 4-1/4" and the card will fit in the standard Medium envelope.

We applied glue stick all over a piece of Whisper White cardstock and positioned the DSP squares. Then we ran it through the Big Shot with a Texturz plate and again with the Top Note die.

Thursday, March 26, 2009

Par-fect Day

My husband's birthday is in June and as an early birthday present, he's renting some clubs and playing a round of golf at the resort this week. Can you imagine golfing with a beach view like this!? It's a little pricey, but certainly an opportunity he may not have again.

So in honor of Jim, here's a card with the brand new And Many Mower stamp set that is coming out in the Occasions Mini Catalog next week.

I used the Texturz plates and the 1-3/8" Circle Punch to make the golf ball. To make the little dimples pop, I rubbed just a little bit of gray chalk from the Stampin' Pastels to help accent the bumps.

Supplies: And Many Mower, A Walk in the Park DSP, Baja Breeze ink refill & cardstock, Kiwi Kiss ink refill & cardstock, Whisper White cardstock, Jet Black StazOn Ink, Blush Blossom marker, Really Rust marker, Going Gray marker, Scallop Oval Punch, Large Oval Punch

Wednesday, March 25, 2009

50th Anniversary Invite & Favor

I recently had the pleasure of helping Tracey design an invitation and favor for her parents' upcoming 50th wedding anniversary. I was inspired by this card on SCS, but incorporated some stamping instead of the dry embossed cardstock. (The swirl is from the Baroque Motfis stamp set.)

The gate fold card is 8-1/2" x 5-1/2" and scored at 2-1/8" and 6-3/8". The gold belly band slides off. (The inside of the card might look something like this.)

Tracey wanted a matching favor that would be easy to make in larger quantities, so we went with this simple matchbook type design featuring a Word Window pocket to hold a Ghiradelli chocolate square.

The scallop circle embellishment is adhered just above the ribbon so that the ribbon slides down and the flap comes up. (You could also just untie the ribbon.)

Measurements for the favor: 2-3/4" x 8-1/2" (you can get four from one sheet of cardstock). Score it at 2", 2-3/8", 5-3/8", 5-3/4". Use the Word Window Punch to punch a slot on the end with the 2" square (Note: to create a larger slot, move your punch over and punch again.) You'll adhere the little piece of cardstock above the slot to the inside of the candy cover.

Supplies: Baroque Motifs, Short Order Alphabet, Versamark, Gold Embossing Powder, Encore Gold ink pad, Bravo Burgundy cardstock, Whisper White cardstock, Brushed Gold cardstock, 1-1/4" & 1-3/8" Circle Punches, Scallop Circle Punch, Scallop Edge Punch, Organza Ribbon

Tuesday, March 24, 2009

A Week Off of Challenges

Well, I obviously won't be participating in the color challenges this week since I'm basking in the sun and acquiring a little color of my own (hopefully not Riding Hood Red!). So instead of my usual challenge entries, I decided to post a new color combination for you to try. I made up this card a couple weeks ago and challenged myself to use Yo Yo Yellow (one of my least favorite colors). I'm warming up to it a bit. It's not so bad when paired with Pacific Point and Pixie Pink! If you try this color combination, leave me a comment so I can check out your creation when I get back!

Here's my card:


Supplies: A Little Birdie Told Me, Whisper White cardstock, Basic Black ink, Pixie Pink cardstock, Yo Yo Yellow cardstock, Pacific Point cardstock, Good Morning Sunshine DSP, Trio Flower Punch, 1/4" Circle Punch, 2-Way Glue Pen, Dazzling Diamonds Glitter, Scallop Edge Punch

Sunday, March 22, 2009

Hawaii Bound & Free Idea Sheet Offer

Today is the day! My husband and I are flying to Hawaii for the Stampin' Up! incentive trip. What could be better than a vacation in paradise? Someone else paying for it! Woo hoo! And although this trip is on Stampin' Up!'s dime, I have to thank my customers and downline for helping me earn my ticket. It was a combination of personal sales and downline promotions that helped me earn the trip. Thank you!!!!

I was hoping to get some Hawaii Blog Candy together before I left, but I'm out of time! So watch for something next week when I get back! Maybe I'll even include something straight from the Big Island!

Until then, I do have a special offer for you! I found a bunch of idea sheets when I cleaned out my cabinet recently. A huge stack of them! Place an online order via my website between now and March 31 and I'll send you one of each of these 40 Inspiration Sheets! (With at least 6 ideas per sheet, that's 240 full-color ideas!) Go to http://juliedavison.stampinup.net/ and click "Shop Now". You'll also get a free Idea Book & Catalog from Stampin' Up! with your online order AND you get can a free Sale-a-bration product for every $50 that you order. Click here for details. Hostess Benefits (aka Stampin' Rewards) applies on all orders over $150.

Saturday, March 21, 2009

Easter Egg Box

I can't remember where I saw an egg box recently...on someone's blog or SCS. It kind of just got stuck in my head and I made up my own using my favorite Sale-a-bration product trio: Polka Dot Punches, Delicate Dots DSP, and Ribbon Bundle. (You can get these for FREE until March 31. Click here for details.)

I used the Coluzzle (which is being discontinued, but is STILL available to order; #102264, $19.95) to cut the oval shaped eggs from the Delicate Dots paper. I cut off the bottom so the box would stand up straight. The box measurements are actually the same as the Bunny Box I posted yesterday.

Springfield Stamp Club and those who attended my downline meeting that night made these boxes using a couple different patterns from the Delicate Dots DSP. I wish I had gotten a picture of everyone's eggs. There were all different. I loved it! Anyway, if you were there that night, I attempted to reduce the size of the box, so the measurements for the box you created are: 3-3/4" x 8-1/2" Whisper White cardstock. Score at 1", 3-3/4", 4-3/4", and 7-1/2", then turn it and score at 1". Cut on the score line up to the 1" score line and fold in for the base of the box.

Here's a side view so you can see how I did the ribbon. I folded it under and attached it to the box with a brad.

Supplies: Polka Dot Punches (embossed in white on Saffron cardstock and punched with 5-Petal Flower Punch), Versamark ink, So Saffron cardstock, Whisper White cardstock, Delicate Dots DSP, Eyelet Border Punch, 1/2" Circle Punch, Pewter Build-a-Brad, Silver Brads, 1/16" Hole Punch, SAB Ribbon Bundle, 5-Petal Flower Punch, Winter White embossing powder

Friday, March 20, 2009

Bunny Box

I enjoy our demonstrator yahoo groups -- we use them to organize card swaps, share business tips, and send project ideas. Tammie recently shared a project her friend Vicki made. As soon as I saw it, I know I just had to CASE it! This was one of the bonus projects my Champaign Stamp Club got to make. (Springfield Club members made a different Easter box, which I'll share tomorrow!)

The bunny face is two Scallop Circles cut with the Sizzix die on my Big Shot. I cut off the bottom so it was stand and not roll. Here are the other punches that make up this cutie patootie bunny:

  • Ears: Wide Oval Punch (Whisper White) & Large Oval Punch (Pretty in Pink)
  • Eyes: 1/2" Circle Punch (Basic Black) & 1/4" Circle Punch (Whisper White); Use glue dots to adhere
  • Nose: Two 1" Circle Punches (Pink Pirouette) and 3/4" Square Punch (Pretty in Pink), cut diagonally and adhered with Stampin' Dimensional
  • Teeth: 3/4" Square Punch (Whisper White); rub edges of cardstock on Going Gray pad

The dimensions for my box are 3-3/4" x 9-3/4", scored at 1-1/4", 4-1/4", 5-1/2", 8-1/2"; Turn it and score at 1" down the long side. Cut the short score lines to the 1" line and fold up these flaps for the base of the box.

I used SNAIL adhesive to hold everything together. The Whisper White cardstock isn't too heavy, so I find this adhesive to be sufficient.

Ooh! I almost forgot the best part! His cottonball tail! I glued it on with the Tombow Multi Adhesive.

Thursday, March 19, 2009

Dry Embossed Vellum Card

I'm short on time this week so I was multi-tasking when I designed this card for Stamp Club using the colors from Stacey's Jewelry Inspiration Challenge #28.

These colors are so fun and springy and perfect for a flower card! I chose the Morning Soft stamp set and tried a new technique -- freehand dry embossing on vellum. I stamped the image with Staz-On ink on vellum cardstock. Then I turned it over on to the foam mat from the Crafters' Tool Kit and used a stylus to trace around the flowers and leaves. The result is a raised edge with a soft white line on the front. I colored the image with markers on the back side for a "stained glass" look. I used Lavender Lace with a little bit of So Saffron in the middle. The leaves are Certainly Celery with Old Olive accents.

I used the 2-way glue pen to adhere the vellum cardstock to a piece of Whisper White cardstock. This adhesive won't show through the vellum.

Supplies: Morning Soft, Lavender Lace marker & cardstock, Certainly Celery marker, Old Olive marker, So Saffron marker, Whisper White cardstock, Vellum cardstock, Jet Black Staz-On ink, Crafters' Tool Kit, Stylus, 2-Way Glue, Sale-a-bration Ribbon Bundle

Wednesday, March 18, 2009

Designer Series Paper Share

[UPDATE: SOLD OUT -- thanks!]

My very favorite accessory in the catalog is Stampin' Up!'s exclusive double-sided designer series patterned papers. You probably notice that I use it on many (probably MOST) of my projects! I usually only get a few different packs because it would cost over $245 to buy them all. Wouldn't it be nice to split them up and share?

Participate in my Designer Series Paper Share and get 6" x 6" pieces of each of these 120 sheets (240 patterns total) for only $30!

This paper share includes the the new speciality textured and printed gloss papers! Plus sign-up now and you'll get a Sale-a-bration Bonus: 2 FREE 6x6" sheets of each of the Delicate Dots DSP (8 sheets total)!

What are you waiting for!? Email me to sign-up and reserve your Designer Series Paper stack!

Tuesday, March 17, 2009

Valentine from my Hubby

Late last month, Jim made me a belated valentine. The best part was just getting to sit with him as he worked on it. I think he knew it was the time more than the finished card that I would enjoy, so it didn't really matter that it was late. He was inspired by this card, which I made for a group swap back in January. He wanted to color the outline and incorporate the flowers and brads like I did, but he changed the main image to the heart.

He stamped "Happy Valentine's Day" on the inside and left the front blank. I told him it needed a greeting, so he stamped "i love you", which is ((wincing)) contraband -- a Close to My Heart stamp. After he stamped it, I told him it wasn't a Stampin' Up! stamp and he responded: "What!? Why did you let me ruin the card with something that wasn't Stampin' Up!?" ((wink))

Supplies: Love You Much, Riding Hood Red cardstock, Close to Cocoa ink & cardstock, Very Vanilla cardstock, Pink Pirouette ink, Blender Pen, Soft Subtles Brads, Trio Flower Punch, Stampin' Dimensionals

Monday, March 16, 2009

Another "Good Egg" Card

Isn't this stamp set the cutest? I was thrilled to use it for Leadership Conference display boards a couple years ago. That chick is just too darn cute!

If you're looking for a new Easter set, make sure to check out the Occasions Mini Sneak Peek. These stamp sets are available for you to order now. Just go to my website (http://juliedavison.stampinup.net/) and click "Shop Now".

Supplies: A Good Egg, Certainly Celery cardstock, So Saffron marker & cardstock, Barely Banana cardstock, Whisper White cardstock, Basic Black ink, Vanilla Grosgrain Ribbon, Retired (??) DSP

Sunday, March 15, 2009

Moving Circle Card Tutorial

I first saw this Moving Circle Card over on Jackie Topa's blog and knew this was the perfect project to show off the new Circle Scissor Plus. We made this card last month in Stamp Club.

I'm not savvy enough for an entire video tutorial, but here's a little slideshow of the card in action:

Directions: [Click on any of the images to view a larger version.]
  1. Use the Circle Scissor Plus to cut to 3-1/2" circles from Whisper White cardstock. Cut an additional circle from scrap paper. Fold the scrap paper circle into quarters to find the center. Hold the scrap paper over the cardstock circles and poke a hole through the center of both circles using the Paper Piercer from the Crafters' Tool Kit. Using the Craft & Paper Scissors (or scissors with a long blade), cut from the edge of both circles to the center hole.

  2. With the cut line on the right side, stamp each circle with the flowers from the Garden Greetings set (Note: The smallest flower on my card comes from the Flight of the Butterfly set). On one circle, leave 1/8 of the circle blank ABOVE the cut line; on the other circle, leave the blank space BELOW the cut line. Using sponge daubers and Stampin' Pastels, color the flowers on the circle with the blank area ABOVE the line.

  3. Hold the circles together with the colored circle in the back. With your finger behind the circles, push the top half forward and slip the blank part of the top circle under the bottom circle. Use a brad in the center to adhere the circles to the 4-1/4" x 4-1/4" card.

  4. Adhere one edge of the top circle to the base of the card using a Mini Glue Dot. (See photo for placement). Adhere an medium size arrow from the My Way punch to a 3/4" Circle punch and adhere it to the back side of the bottom circle. (Again, see photo for placement.)

  5. Stamp greeting in empty space. Use the arrow tab to move the bottom circle clock-wise, revealing the colored flowers on the bottom circle. (Note: There is nothing to stop the circle when you get to the end, so if you keep going, the circles will slide apart.)
Supplies: Garden Greetings, Flight of the Butterfly (tiny flower), Full of Life (greeting inside), Whisper White cardstock, Chocolate Chip ink, Delicate Dots DSP, Circle Scissor Plus, Stampin' Pastels, Sponge Dauber, Silver Brads, 3/4" Circle Punch, My Way (arrow) Punch, Crafters' Tool Kit

Saturday, March 14, 2009

Sketch Series #5

I've been wanting to try this layout again ever since I made this Starring You Trio back in October. (It's the third card on that post.) I finally got around to it with Stacey's Jewelry Color Inspiration Challenge #27.

As soon as I saw the necklace for this week's color inspiration, I knew I had to break out my Pretties Kit! I used the Stampin' Write markers (brush tip) to color directly on to the flowers (which come white). As I am uploading the picture, I'm thinking I should have done another purple flower to peek out from behind the pink one...

Supplies: Fundamental Phrases, Pretties Kit (flowers & rhinestone brad), Lovely Lilac marker & cardstock, Pink Passion marker/ink, Yo Yo Yellow marker, Whisper White cardstock, Stampin' Up! Backgrounds 1 Texturz Plates for the Big Shot

And while making birthday cards last week, I discovered that this layout also works just as well upside down!

Supplies: Flowers for All Seasons, Many Mower (greeting), Delicate Dots DSP, Certainly Celery marker & cardstock, Bashful Blue marker & cardstock, Whisper White cardstock, Basic Black ink, So Saffron marker, Going Gray marker, Blender Pen, SAB Ribbon Bundle

Thursday, March 12, 2009

SIP Cards

If you're ready to start stamping, take a SIP. All you need is Stamps, Ink, and Paper.

I'm not sure who came up with it originally, but I love this analogy. I used it on a little flyer for new stampers at Jenn's workshop last month. We made these simple cards at her party and I offered a new stamper bundle to Jenn's guests which included all the items to make more these cards at home.


Pun Fun New Stamper Kit:
  • Pun Fun, #115054, $32.95
  • Staz-On Jet Black Ink Pad, #101046, $7.95
  • Markers ($3.25 x 3) = $9.75
    Certainly Celery #105106, Bashful Blue #105111, So Saffron #105114
  • White Notecards & Envelopes (20), #107311, $5.95
    Subtotal: $56.60**

    ** Qualifies for FREE Sale-a-bration Gift ($20 value; see brochure)
    ** Order this kit and I’ll send you extra pre-cut cardstock (10 pieces each of Whisper White and So Saffron and Delicate Dots DSP) to make these cards!

Order Online Any Time! Go to my website: http://juliedavison.stampinup.net/ and click "Shop Now".

Wednesday, March 11, 2009

A Card Without Color

I suppose gray is a color though, so technically this isn't a card without color. Kristina Werner's Color Inspiration Challenge #45 was especially challenging this week because gray, black, and white are the only three colors!

I love the way my card turned out -- very classic and elegant in the monochromatic tone. I think it would be perfect for a wedding or anniversary. I used some brand new products from the Occasions Mini catalog (Walk in the Park DSP & Whisper White Satin Ribbon) and the Little Leaves sizzlit from the big catalog.

Supplies: Warm Words, Going Gray cardstock, White cardstock, Basic Black ink, Walk in the Park DSP, Whisper White Satin Ribbon, Little Leaves die for the Big Shot

Tuesday, March 10, 2009

To Polka Dot Punch or Not?

Here's a card from my last class in Springfield. We used the Sale-a-bration stamp set Polka Dot Punches, but ironically, we didn't punch anything! The best part of this set is that it coordinates with some many of our great punches, but I made everyone cut the flower by hand! (For the record -- that stamp coordinates with the circle punch. We don't have a punch that cuts the outline of the flower.)

There's only three weeks left to take advantage of Sale-a-bration and get free gifts for your qualifying order. Click here to check out all the details.

Supplies: Polka Dot Punches, Thank You Kindly, Bashful Blue ink & cardstock, So Saffron ink & cardstock, Certainly Celery ink & cardstock, Whisper White cardstock, Delicate Dots DSP, Bashful Blue grosgrain ribbon, Soft Subtles brads

Sunshine Garden Quick Cards

I love the Sunshine Garden Simply Scrappin' Kit. The colors are so soft and springy. Simply Scrappin' Kits are very versatile and can be used for scrapbook pages, cards, gifts -- well, anything your little heart desires.

We'll be using pieces of this kit to make some Quick Cards on Saturday in Springfield and again in three weeks over here in Champaign. If you can't make it or live too far away, you can get the project kit and make the cards at home. Click here for more information.

This is one of my favorites of the bunch:

Monday, March 9, 2009

Happy Easter Circle Card

I was going to post a new tutorial tonight, but I ran out of time. Check back Wednesday for it. In the meantime, here's a colorful Easter card I made last year for the Leadership Conference display board.

I used a variety of circle punches and DSP to represent Easter eggs. The main image is cut with the Coluzzle.

Supplies: A Good Egg stamp set, So Saffron marker & cardstock, Basic Black ink, Whisper White cardstock, Palette of Prints DSP, 1/2", 1", 1-1/4", 1-3/8" Circle Punches, Coluzzle

Sunday, March 8, 2009

More Decor Elements Photos

Have you seen the latest vinyl art available from Stampin' Up!? The Decor Elements line was expanded this winter to include new art and new colors. Click here to check out the latest brochure. You can order Decor Elements online via my website (http://juliedavison.stampinup.net/) -- just click "Shop Now". Send me an email if you'd like to receive a free copy of this brochure in the mail.

Last month I added some new Decor Elements to my walls. I wanted to put up the new tree image, but my husband didn't like it, so we settled on this quote to go over the couch in our family room: "Life isn't a matter of milestones, but of moments."

And I finally got around to adding the Manhattan Flowers to our recently re-finished guest bathroom:

It's hard to see the Kraft flower in the second bathroom photo because of the glare off the mirror. But you can see how the Chocolate flower goes right over the corner and on to the other wall. I love that!
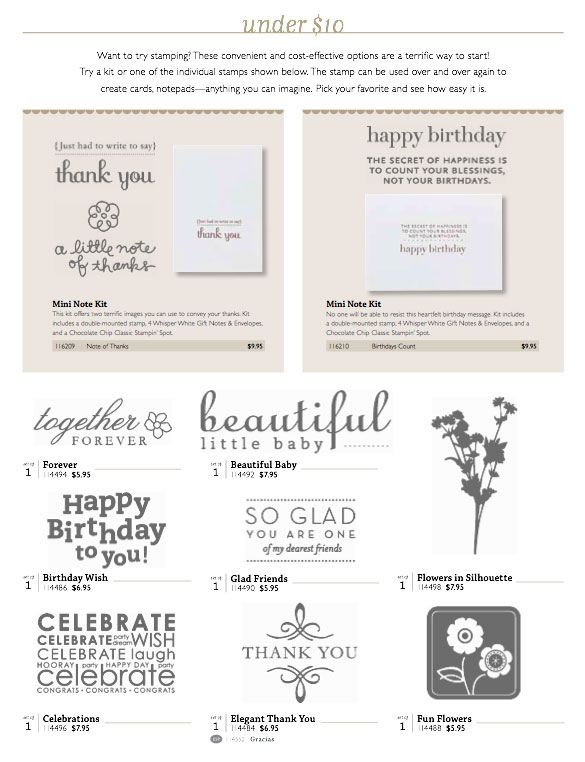
Decor Elements are so easy to apply! My favorite part is that they are removable and do not leave any marks on the wall when you take them down -- making it the perfect way to dress up the walls of a rented apartment or college dorm room. Click here to see more pictures of Decor Elements applied in my home.